How To Replace Windshield Wiper Blades Rubber Toyota Corolla | Step-by-Step DIY
 ByAliza
Replacing the windshield wiper blade rubber on a Toyota Corolla is a simple DIY maintenance job that can improve visibility, reduce streaks, and prevent annoying skipping across the glass. Instead of replacing the entire wiper blade assembly every time, some Corolla models allow you to replace only the rubber insert. The exact design varies by model year and wiper type, so check your existing blade before purchasing a replacement.
This guide explains how to replace windshield wiper blades rubber on a Toyota Corolla, including the tools you need, how to remove the old rubber, how to install the new insert, common mistakes, and practical maintenance tips.
What You Need Before Starting
You don’t need a large collection of tools for this job. In most cases, the replacement rubber insert and a few basic items are enough.
- Replacement wiper rubber: Choose the correct length and profile for your Toyota Corolla.
- Small flat-head screwdriver: Useful for releasing clips or tabs on certain blade designs.
- Clean microfiber cloth: Protects the windshield and removes dirt from the blade area.
- Tape or a folded towel: Can protect the windshield if the wiper arm accidentally drops.
- Measuring tape: Helpful if you need to verify the length of the old rubber.
- Gloves: Optional, but useful because old wiper rubber can leave black residue on your hands.
Before You Buy Replacement Rubber
Do not assume that every Toyota Corolla uses the same wiper insert. Corolla generations and replacement blade designs can differ.
Check these details first:
- Toyota Corolla model year
- Driver-side wiper length
- Passenger-side wiper length
- Rear wiper size, if applicable
- Conventional, hybrid, or beam-style blade
- Shape and thickness of the replacement rubber
- Type of retaining clips or rails
Fact: Wiper insert compatibility depends on the blade construction, not simply the vehicle name. Two Corolla model years can use different blade designs.
Why Replace the Rubber Instead of the Entire Blade?
Replacing only the rubber insert can be economical when the existing metal frame or blade assembly is still in good condition.
Potential advantages include:
- Lower replacement cost
- Less material waste
- Faster installation
- Reusing a good-quality blade frame
- Maintaining the original blade structure when compatible
However, if the blade frame is bent, cracked, loose, corroded, or damaged, replacing the complete wiper blade may be the better option.
Step-by-Step Toyota Corolla Wiper Rubber Replacement:

Step 1: Park the Corolla Safely
Park the car on a level surface and switch the ignition off.
Make sure the wipers are in their normal parked position before beginning.
If your Corolla has a special service position for the wipers, follow the instructions in the owner’s manual.
Important: Do not work with the wipers operating automatically. Keep the ignition off and make sure the wiper system cannot suddenly activate.
Step 2: Protect the Windshield
Place a folded towel over the windshield underneath the wiper arm.
This is a simple but important precaution.
If the spring-loaded wiper arm falls against the glass while the blade is removed, the metal arm can potentially damage the windshield.
Step 3: Lift the Wiper Arm
Carefully lift the wiper arm away from the windshield.
Hold it firmly rather than allowing it to spring upward.
Look closely at the connection between the wiper arm and blade.
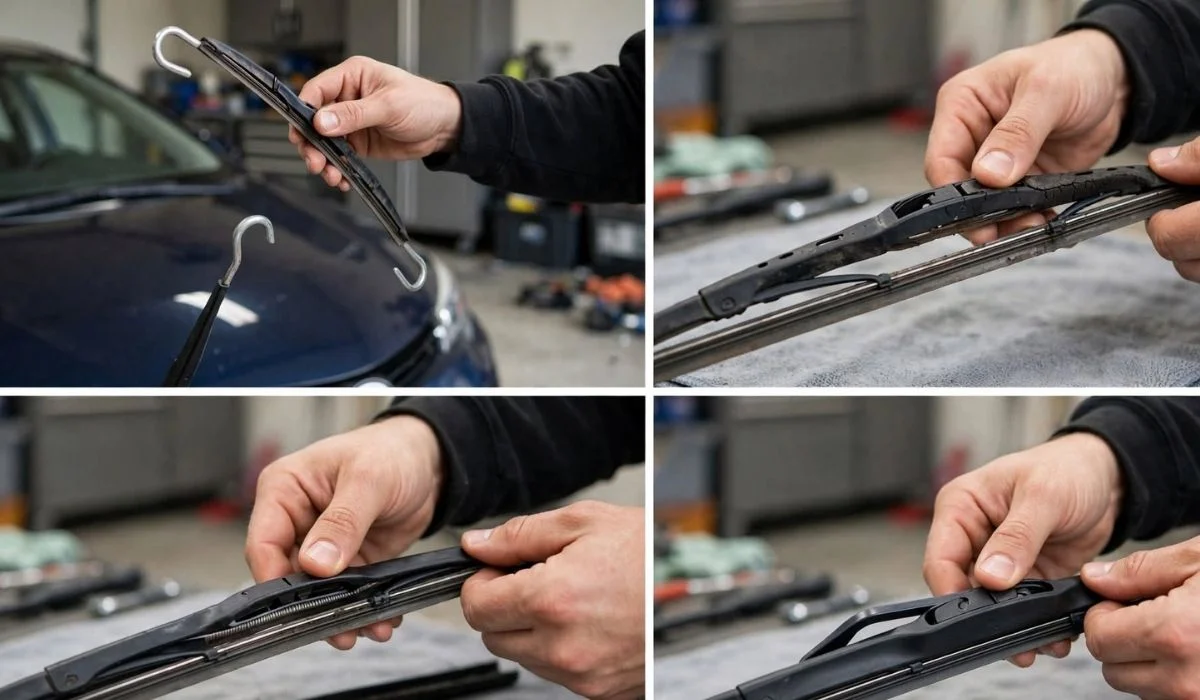
Depending on the Corolla and blade design, the blade may use a hook, clip, button, or another attachment system.
Step 4: Remove the Wiper Blade Assembly
Release the blade from the wiper arm according to its attachment style.
For a hook-style design, the blade is generally rotated and slid out of the hook after releasing the retaining mechanism.
For a button or clip-style blade, press or release the locking mechanism before sliding the blade away.
Don’t force the connection.
Fact: Wiper attachment mechanisms vary between vehicle generations and replacement blades, so forcing a blade can break the plastic adapter.
Step 5: Inspect the Existing Blade
Before removing the rubber, inspect the blade carefully.
Look for:
- Cracked rubber
- Hardened rubber
- Torn edges
- Missing sections
- Bent metal rails
- Broken end clips
- Corrosion
- Loose components
If the frame is damaged, replacing only the rubber may not solve the problem.
Step 6: Remove the Old Rubber Insert
Place the blade on a clean surface.
Locate the end of the blade where the rubber insert is retained.
Some blades have an end cap or locking tab that must be released first.
Once the retaining mechanism is open:
- Hold the old rubber firmly.
- Slide it along the blade channel.
- Remove it gradually rather than pulling aggressively.
- Keep any reusable metal support rails if the replacement insert requires them.
Some replacement rubbers are supplied with their own rails, while others require transferring the original rails.
Read Next: How To Jumpstart A Car
Step 7: Keep Track of the Metal Rails
This step is easy to overlook.
Many wiper inserts use thin metal strips that support the rubber and help it maintain its shape.
If your new insert does not include replacement rails, carefully remove the rails from the old rubber.
Keep them aligned in the same orientation.
Check for:
- Bends
- Rust
- Deformation
- Damaged ends
- Uneven seating
If the rails are badly damaged, use a complete replacement blade instead.
Step 8: Clean the Blade Channel
Before installing the new rubber, clean the blade frame.
Use a microfiber cloth to remove:
- Dust
- Road grime
- Old rubber residue
- Dirt
- Small pieces of debris
A dirty channel can prevent the new insert from sliding correctly.
Step 9: Install the New Wiper Rubber
Compare the new insert with the old one before installation.
The replacement should have the same general:
- Length
- Profile
- Groove configuration
- Retaining design
- Rail compatibility
Slide the new rubber into the blade channel carefully.
Keep the rubber straight as you feed it through the frame.
Do not twist the insert.
Step 10: Lock the Rubber Into Position
Once the new rubber reaches the end of the blade, make sure it is fully seated.
Check that:
- The rubber is centered.
- The supporting rails are correctly positioned.
- The end retaining mechanism is secure.
- The rubber slides evenly through the frame.
- No section is sticking out incorrectly.
Give the insert a gentle pull to make sure it cannot easily slide out.
Step 11: Reattach the Blade to the Wiper Arm
Place the blade back onto the wiper arm.
Make sure the attachment mechanism clicks or locks into place.
Give the blade a gentle tug to verify that it is securely attached.
Never assume it is locked simply because it appears to be in position.
Step 12: Lower the Wiper Arm Carefully
Hold the wiper arm and lower it slowly onto the windshield.
Do not let it snap against the glass.
Remove the protective towel once both the blade and arm are safely positioned.
Step 13: Test the New Rubber
Spray windshield washer fluid onto the glass before testing the wipers.
Activate the wipers briefly.
Watch the movement carefully.
A correctly installed insert should generally:
- Move smoothly
- Maintain contact with the windshield
- Clear water effectively
- Avoid excessive skipping
- Leave minimal streaking
If the blade chatters, skips, or leaves large areas uncleared, stop and inspect the installation.
How to Tell If Your New Wiper Rubber Is Installed Correctly?
Check the Rubber Alignment
The rubber should sit evenly inside the blade frame.
It should not be twisted or folded.
Check the End Locks
Both ends of the insert should be properly retained.
A loose end can allow the rubber to move during operation.
Check Windshield Contact
The wiping edge should make consistent contact with the windshield.
If part of the blade floats away from the glass, the blade frame may be damaged or incompatible.
Check for Streaks
A small amount of moisture can remain after wiping, but significant streaking may indicate:
- Incorrect rubber size
- Poor installation
- Dirty windshield
- Dirty blade
- Defective replacement rubber
- Damaged blade frame
Common Mistakes to Avoid?
Buying the Wrong Insert
The cheapest replacement isn’t useful if it doesn’t fit the blade.
Always verify compatibility before purchasing.
Pulling the Rubber Too Hard
Excessive force can damage the blade frame or retaining clips.
Work slowly.
Forgetting the Metal Rails
If the new insert requires the original support rails, don’t throw them away with the old rubber.
Installing the Rubber Backward
Some inserts have a specific orientation.
Compare the old and new pieces before installation.
Dropping the Wiper Arm
Never leave a bare spring-loaded wiper arm standing against an unprotected windshield.
Use a towel or hold the arm securely.
Testing on a Dry Windshield
Running a wiper over dry, dirty glass creates unnecessary friction and can make diagnosis more difficult.
Use washer fluid when testing.
When Should You Replace Toyota Corolla Wiper Rubber?
There isn’t one universal replacement interval because climate, parking conditions, windshield contamination, and usage all affect wiper life.
Look for visible or performance-related signs such as:
- Streaking
- Skipping
- Chattering
- Squeaking
- Cracked rubber
- Hardened edges
- Torn rubber
- Poor water removal
- Unclear sections of the windshield
Fact: Wiper rubber can deteriorate even when the wipers aren’t used frequently. Heat, sunlight, ozone, dirt, and environmental exposure can contribute to rubber deterioration.
How to Make New Wiper Rubber Last Longer?
Keep the Windshield Clean
Dirt and grit can act like abrasive material between the rubber and glass.
Clean the windshield regularly.
Clean the Wiper Blades
Use a damp microfiber cloth to gently remove dirt from the wiping edge.
If the rubber is visibly damaged, cleaning it won’t restore the damaged material.
Don’t Use Wipers to Remove Heavy Debris
Remove leaves, ice, or other debris manually when appropriate rather than forcing the wiper across it.
Keep Washer Fluid Available
Using appropriate windshield washer fluid helps the wipers work without unnecessarily dragging across dry glass.
Driver-Side and Passenger-Side Wiper Blades:
Don’t automatically assume that both front wipers use the same length.
Many vehicles use different lengths on the driver and passenger sides.
Before replacing the rubber:
- Measure the existing insert if necessary.
- Check the vehicle-specific fitment.
- Compare the new insert with the original.
- Confirm that both ends match the existing blade structure.
For the most reliable fit, use your Corolla’s exact model year and trim information when checking replacement compatibility.
What About the Rear Wiper?
If your Toyota Corolla has a rear wiper, its construction can be different from the front blades.
Do not automatically use the same rubber insert.
Check:
- Rear blade length
- Blade profile
- Attachment design
- Insert width
- Manufacturer compatibility
Some Corolla body styles may not have a rear windshield wiper at all.
Troubleshooting After Replacement:
The Wiper Leaves Streaks
Check whether the windshield itself is dirty.
If cleaning doesn’t help, inspect the rubber for incorrect seating or damage.
The Wiper Skips Across the Glass
Possible causes include:
- Incorrect rubber profile
- Damaged blade frame
- Dirty windshield
- Incorrect installation
- Hardened or poor-quality replacement rubber
The Wiper Makes Noise
A small amount of noise can occur during operation, but persistent chattering or squeaking deserves inspection.
Check blade alignment and windshield cleanliness first.
The Rubber Slides Out
Stop using the wiper until the issue is corrected.
The insert may not be properly locked into the blade frame.
The Blade Doesn’t Stay Against the Windshield
The blade frame or wiper arm could be damaged.
Replacing the rubber alone may not fix the problem.
Rubber Insert vs. Complete Wiper Blade:
| Replacement | Best For | Main Advantage |
|---|---|---|
| Rubber insert | Good existing frame | Lower-cost repair |
| Complete blade | Damaged or worn frame | Simple complete replacement |
| Premium blade assembly | Frequent use or difficult conditions | May offer improved construction |
If the frame is straight and functional, an insert can be a practical option. If the frame has deteriorated, replacing the complete blade is generally more sensible.
Toyota Corolla Wiper Rubber Replacement Checklist:
Before finishing the job, check each item:
- Correct replacement rubber selected
- Correct driver-side length
- Correct passenger-side length
- Rear insert checked separately if applicable
- Windshield protected
- Old rubber removed completely
- Support rails inspected
- Blade channel cleaned
- New rubber installed straight
- Retaining clips secured
- Blade reattached correctly
- Wiper arm lowered carefully
- Washer fluid used for testing
- Wipers tested for smooth operation
When DIY Replacement Isn’t the Best Choice?
Replacing an insert is usually straightforward, but there are situations where replacing the complete blade—or getting professional help—is more appropriate.
Consider another solution if:
- The wiper arm is bent.
- The blade frame is damaged.
- The attachment mechanism is broken.
- You cannot identify a compatible insert.
- The blade remains loose after installation.
- The windshield has chips or damage affecting wiping.
- The wiper mechanism itself isn’t working properly.
A new rubber insert cannot correct a bent wiper arm or mechanical problem.
Final Thoughts:
Learning how to replace windshield wiper blades rubber on a Toyota Corolla can save time and money when the existing blade frame is still in good condition. The process mainly involves removing the blade, taking out the old rubber, transferring support rails when required, installing the correct replacement insert, securing the retaining mechanism, and testing the result with washer fluid.
The most important part isn’t rushing the installation—it’s choosing a compatible rubber insert and making sure it is properly seated. If the blade frame or wiper arm is damaged, replacing the complete assembly is usually the better solution.
FAQs:
Can I replace only the rubber on Toyota Corolla wipers?
Yes, depending on the specific Corolla model year and wiper design. Some blades are designed to accept replacement rubber inserts, while others are better replaced as a complete assembly.
How do I know what wiper rubber size my Corolla needs?
Use your Corolla’s model year, trim, and existing blade specifications to verify fitment. You can also compare the replacement insert with the old one before installation.
Do I need special tools to replace wiper rubber?
Usually, no. A replacement insert and a clean cloth are often enough. Some blade designs may require a small screwdriver to release a retaining clip.
Can I reuse the metal rails from the old wiper?
If the replacement insert is designed for the original rails and they are straight and undamaged, they may be reusable. Follow the replacement insert’s instructions.
Why are my new wipers still streaking?
Dirty glass, incorrect installation, incompatible rubber, damaged blade frames, or defective rubber can all cause streaking. Clean the windshield and inspect the blade before assuming the new rubber is faulty.
How long does Toyota Corolla wiper rubber last?
There is no single lifespan that applies to every Corolla. Sun exposure, heat, weather, dirt, usage, and storage conditions can all affect the rubber. Replace it when performance or visible deterioration indicates that it is worn.
Should I replace both front wiper rubbers at the same time?
It is often practical to replace both if they have similar age and wear. However, inspect each blade individually because their condition may differ.
Can I install new rubber on a damaged blade frame?
You can physically install it in some cases, but it may not perform correctly. If the frame is bent, cracked, corroded, or loose, replacing the complete blade is generally preferable.
Is replacing wiper rubber difficult for beginners?
For a compatible blade design, it is generally a beginner-friendly maintenance task. The most important precautions are protecting the windshield, using the correct insert, and confirming that everything is securely locked before operating the wipers.